

Google Ads is a powerful tool for small and medium-sized businesses aiming to craft an online presence. They help you complement your organic marketing efforts and strengthen your results by showing your products and services across Google Suite. Using Google Ads advertisement campaings, your business can appear in the world’s most used search engine results and on Maps, YouTube, and Gmail.
Advertising on Google can increase your reach, lead generation, and customer acquisition. They let you focus on people searching specifically for what your business offers, so you don’t have to catch them unexpectedly. The first two or three results in almost every Google search are advertisements, easily recognizable because they show “Sponsored” above the result.
If you’re eager to explore all the features Google Ads offers for your business and would like some help while starting, this is the guide for you. By the end of it, you’ll have your first campaign set up and ready to go out into the world!
The first step to creating campaigns on Google Ads from scratch is to create your Google Ads Account. So, go to ads.google.com and click on “Get Started”. Log in with your Gmail and set up the account details:
When setting up your campaign, you can choose to receive help from a Google Ads expert via email or text.
After setting up your account, you’ll typically be redirected to the main dashboard, where you’ll be suggested to explore their keyword planner (we’ll discuss this more in the next few steps).
Sometimes, you’ll be prompted to create your first campaign in Smart mode. If this doesn’t show up, you can create a new campaign by going to the left-side panel, clicking “Create,” and selecting “Campaign.”
However, before giving life to your campaign, we must discuss Smart Mode and Expert Mode, the primary modes in which you can run your campaigns on Google. They have unique strengths and weaknesses, and choosing the right fit for you will depend on your business’s marketing goals and your knowledge of paid advertising.
In the Smart Mode, you’ll create intelligent campaigns quickly and almost in “automatic mode.” They’ll start by asking you to select a campaign objective, and then you can use your business information in your Google Business Profile if you have one to feed the campaign.
They work based on algorithms and will appear to the people they think are more likely to be interested in your products. Smart campaigns automatically adjust bid strategies, targeting, and ad placements. The Smart Mode is crafted for Google Ads beginners who want to set up a campaign quickly without investing too much time adjusting and optimizing it.
Meanwhile, expert mode gives you access to advanced customization and report tools and lets you manually select from Google’s six campaign objectives. You can also choose the ad types, bids, and targeted audiences that best suit your marketing goals.
In that sense, you must also manually track and adjust your campaign’s performance. Expert mode is aimed at experienced marketers who are proficient in paid advertising.
However, setting up a campaign in Expert Mode is not rocket science, and the user-friendly platform will guide you through all the steps required. Also, manually setting your campaign allows you to target niche and specific audiences that may yield better results in the long term
If you decide to try the expert mode, the first step is to switch your account to it. You can do that in two ways:
If you were prompted to smart mode right after creating your account, click on the Switch to Expert Mode link below the page.
If you were taken straight to the main dashboard, go to the Tools icon on the left sidebar. If you don’t see the option, you’re already in expert mode.
Once on the main dashboard, go to Billing to set up your payment information so you don’t have issues publishing your campaigns.
Now that we’re set up, it is time to create your campaign.

As we’ve seen in other guides, every marketing campaign begins with setting a goal, and Google Ads advertisement campaigns are no exception. Google offers you six main goals to choose from:
• Drive sales: As its name suggests, this campaign aims to drive sales online, whether through your app, website, or phone.
• Leads: This is to get leads and other conversions by encouraging people to take action and share their contact information with you. Leads are people who have shown interest in your business and who can eventually be converted into customers.
• Website traffic: Use it when you want to increase the visits to your website.
• App promotion: This intends to get more installs, engagement, or pre-registrations for your app.
• Awareness and consideration: Use it to reach a broader audience and build interest in your brand and business.
• Local store visits and promotions: This aims to promote your store and get more visits.

Once you have set your campaign goals, a board to select the campaign type should appear below.
You may also notice that these objectives are similar to those on Facebook Ads, so if you’re familiar with that platform, Google Ads will be easy to understand. If you still haven’t tried paid ads on Facebook, we have a helpful guide to get you started, and you can check it out here.
Google has seven campaign types in total. The options shown in this step will be based on your goal, so it’s expected that you only suggest one or two campaign types. The Google Ads campaign types determine where your ads will appear and how they’ll look, so it’s essential to take the time to select the one that works best for your goal. Let’s see a brief overview of each one:
This is great for performance advertisers or people who aim to maximize their results as much as possible.
Tip: Remember to always plan your keywords before writing the advertisements.
This campaign type is excellent if you’re looking to drive traffic to your website, sales, or leads as your ads appear to people already searching for your offer.
The key to these campaigns is to use visually appealing ads to attract the attention of your target audience.
When you select your campaign type, Google Ads will prompt you to enter your business website information to customize your campaign based on that information. This is optional, and if you don’t wish to, simply click on the “Continue” blue button below the screen.
After picking your campaign type, you’ll be asked to select a conversion goal. Think of them as the specific objectives of your campaign. In our previous example, our main purpose is to drive people to our website, but the specific purpose would be to lead people to view a particular page. This is what Google Ads calls a “page view.”

The conversion goal will vary depending on your main objective in the first step. For example, if we choose “Drive sales” instead of “Website traffic,” the conversion goals will be focused on generating purchases or subscriptions.

Once done, you can rename your campaign to help you identify and track it easier on the dashboard.
Here, Google will ask you to select the metrics you want to focus on. This will optimize the budget to reach the goals you’ve chosen. In our case, Google Ads suggests conversions, conversion value, clicks, and impressions share.
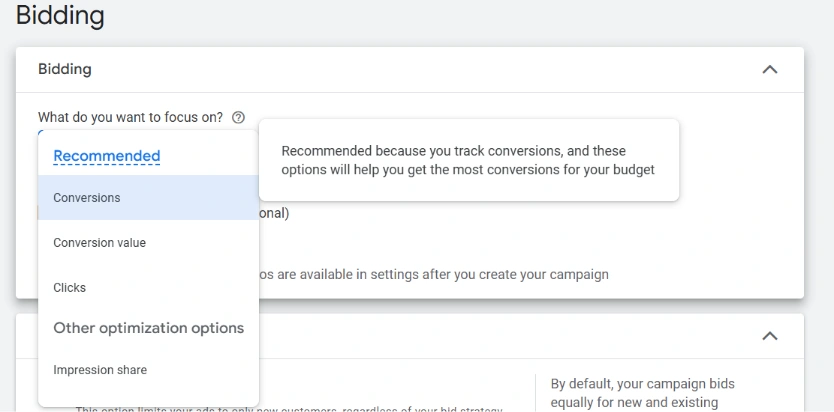
However, it can show different metrics depending on your campaign’s goals and types. Some of these are:
We’ll go for the basics and leave it on “Conversions.”
You can also bid only for new customers. This option will optimize your budget to show your ads only to new customers, excluding existing ones if you have them.
It is time to tailor your audience to those who will likely be interested in your business and interact with your ads. But before getting started, you have the option to show your ads on the Google Search Partner Network and the Google Display Network. This will show your ads on other websites that are Google subsidiaries and can increase your reach without increasing costs.
Once you decide whether to appear on Google Network, you need to select your audience location and language. You can choose from the suggestions shown or type in your specific location. For example, we chose Florida as our targeted location and English as our targeted language.
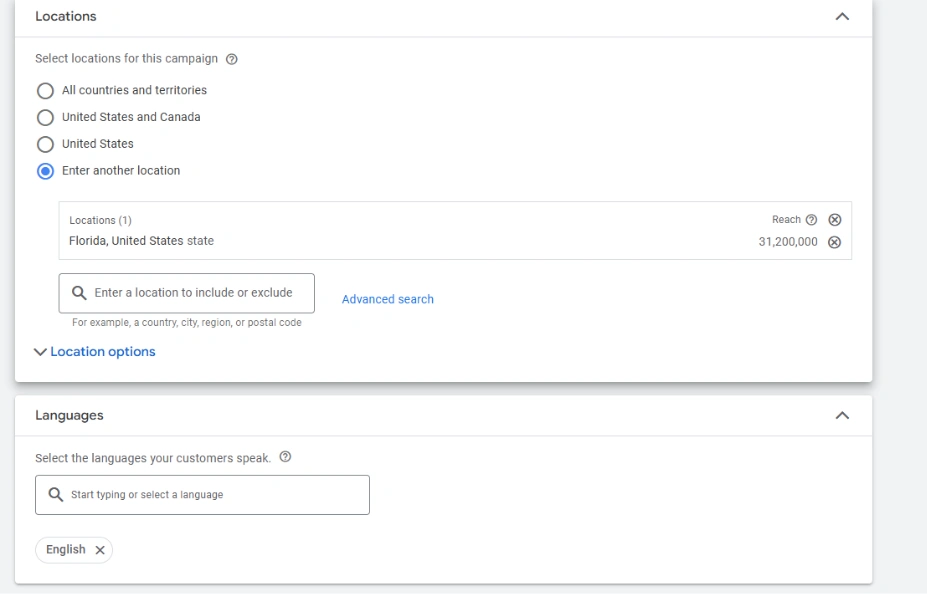
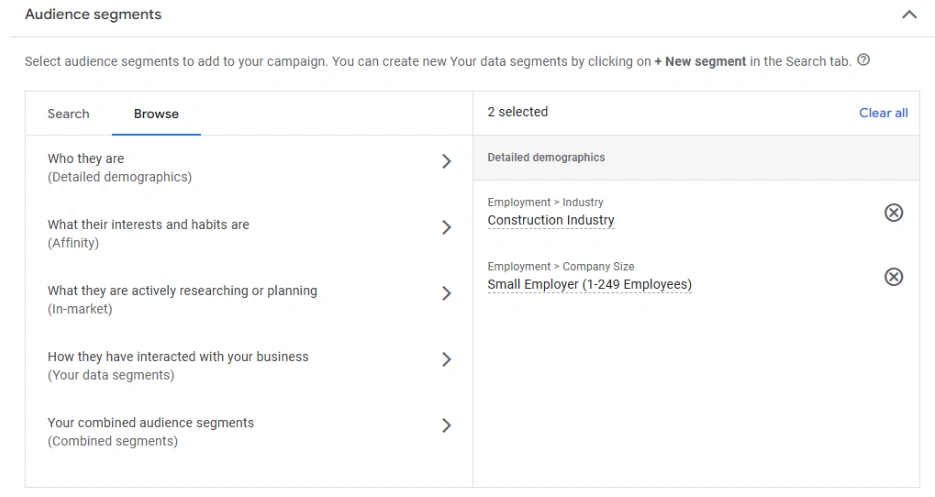
You can also narrow your audience using the filters in the “Audience segment” section. Click on the “Browse” tab to access all the options for specifying your target public.
Then, you’ll have to choose the keyword match type. By default, Google will ask if you want to use “broad match” keywords. If you decide to leave it “on,” your ads will show up in any user search related to your keywords. So, if one of our keywords is “paid marketing,” and a user searches “what is paid advertisement” on Google, then any of our ads focusing on our paid marketing services can show up in their results.
If you don’t want your reach to be so broad, select “off.”
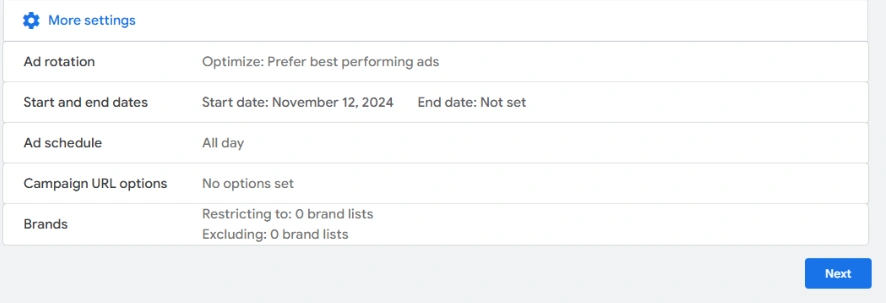
In “More settings,” you can select the hours and dates on which you want Google to show your ads. Doing so can increase your chances of getting the results you’re looking for with your Google Ads advertisement campaign.
Bringing our example campaign back, let’s say we want our customers to visit our webpage about our paid marketing services throughout December. In that case, we click on “Start and end dates” and select from Dec. 1st to Dec. 31. That way, Google will show our ads only during that month and won’t spend any money in January.
Also, if, for example, our target audience is only available to read websites during lunch hours, then we can set our ad schedule to 12:00 PM to 2:00 PM to increase our chances of potential customers visiting our website and reading the content.
We’re slowly reaching the end of the journey here.
Once you finish the previous step, Google will prompt you to use their generative AI assistant to generate keywords, headlines, descriptions, and creatives for your ads. You only need to put the link for your landing page or where you want people to go after they are on your ad. In our example, we would put our website’s paid advertising page.
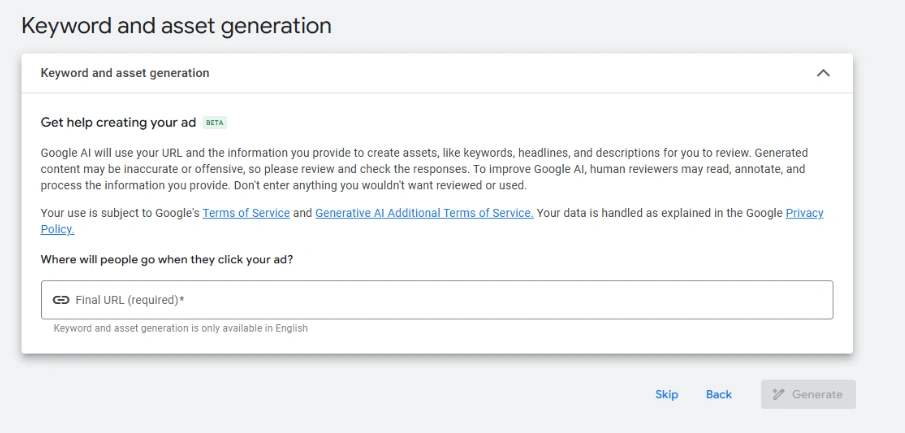
However, remember this is a beta feature, and generative AI can provide inaccurate or biased information, so be careful and double-check the results if you choose to use it.
If you prefer to use traditional methods, just click on “Skip.” The platform will take you to the manual ad setup. Here, you will first need to input your keywords. The keywords entered are the ones you’ll bid for, and if you win the auction, your ads will appear in that keyword search.
Below, we entered a few keywords related to “paid marketing.” When a user searches these terms, our ads will match them.

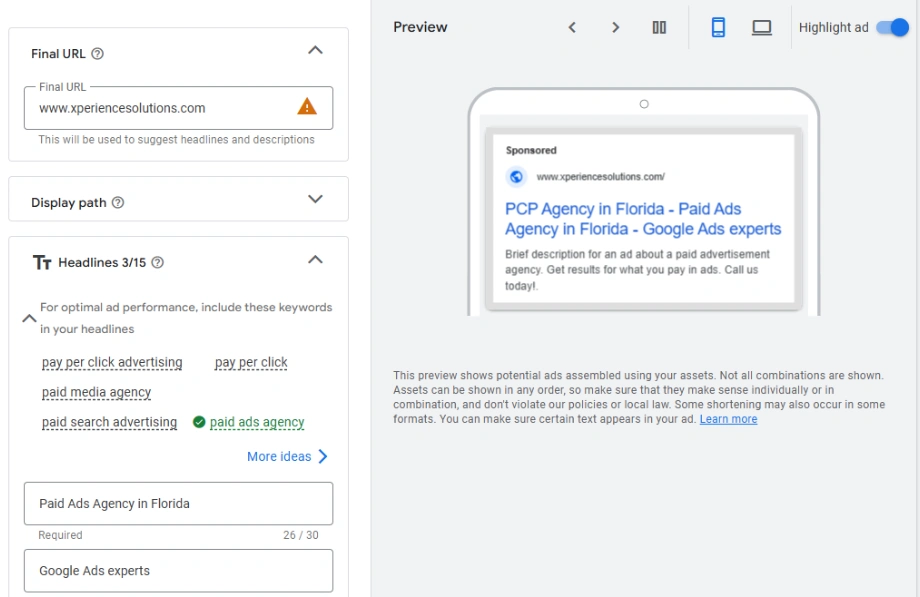
Once you finish your keywords, it is time to work on the ads display. In the left column, you can enter the headlines for your ads, descriptions, other links inside your website, and the call to action for your advertisement. Remember that Google requires a minimum of 3 headlines and two descriptions so your ads can rotate in every view.
Finally, your ad preview should look similar to this one:
Budgeting can be tricky if you’re new to paid advertising. If you go too low, your campaign performance can be affected, and your ads won’t get you enough results. But, if you go too high, you may burn out money without getting results.
A simple way to calculate your budget is to research the average cost per click on your selected keywords and divide it by 30.4, the number of days an average month has. This way, you can estimate how much you should pay for your ads to be shown in the results.
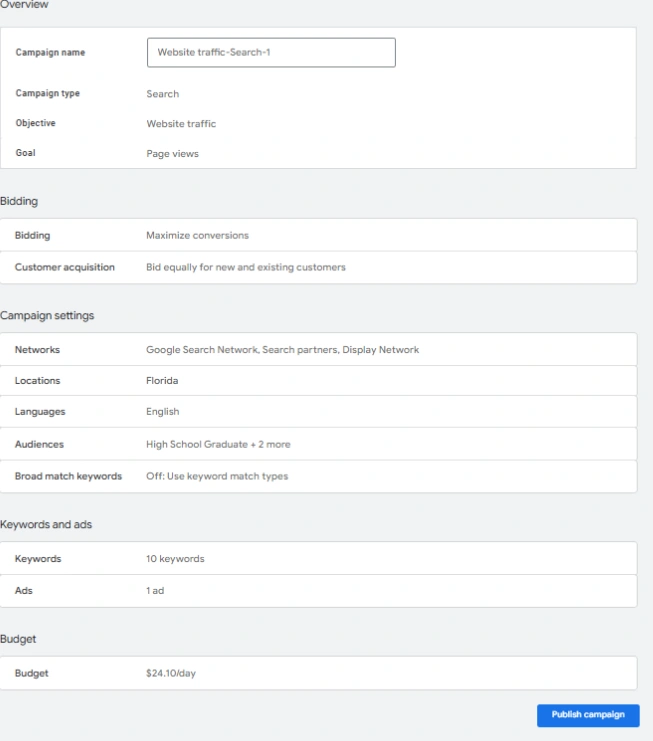
Besides this, Google will also show you three recommendations based on your campaign settings and bidding. In our case, it prompts us to spend an average of $24.10 daily. This means that one day, Google can spend $24.10; on the other day, it may rise to $28.92 if it means more clicks and conversions.
Once you choose your daily budget, click “Next” to review your campaign before launching it.

You’ll see an overview of your freshly baked campaign at this stage. Review each segment thoroughly to ensure all details are correct and your ads have no grammatical errors (you must give your best first impression). In this stage, Google can also show recommendations to improve any part of your campaign before launching it.
If everything is ready, all you need to do is hit the “Publish campaign button.” This will send the ads for review so Google can ensure they don’t violate any of their guidelines. After 24 hours, you’ll be notified if your ads are approved.
Remember to track its performance often to adjust your ads if needed. You can access your Google Ads analytics by clicking “Campaigns” in the left column and selecting “Campaigns.”
Although it may seem like there are too many steps, once you’ve gotten a grip on the platform, you’ll set up your campaigns with closed eyes.
Still, at Xperience Marketing Solutions, we understand that mastering Google Ads can take time and generate frustrations, especially if paid marketing is not your expertise. If you want to save the hustle of setting up your account, learning about campaign goals, and having your design intern create ten visuals per week to set up your ads, then Xperience Marketing is right here for you.
We’re a certified Google Partner, and Google has trained our SEM team in Google Ads. Thus, when you partner with us to enhance your paid advertising, you are confident a team of PCP experts is managing your ads campaigns, ensuring you reach your goals and don’t waste money on paid ads that nobody clicks on.
If you’re ready to enjoy the benefits of paid advertising without burning your eyelashes while learning how to advertise on Google, call us today at 772 905-3005!